

Yin yoga poses offer a slower, quieter way to practise yoga. Instead of flowing quickly from one shape to the next, you settle into a pose, support your body well, and stay there for several minutes. That stillness is the point. It gives muscles time to soften, joints time to be gently loaded, and the mind time to stop rushing ahead to the next thing.
This guide explains what yin yoga is, how it differs from faster styles, and which poses are most useful for beginners. It includes sensible hold times, clear setup tips, a simple 35-minute sequence, and the mistakes that most often get in the way. You do not need to be flexible to start, and you do not need special equipment beyond a mat, a couple of cushions, and a blanket.
What Is Yin Yoga?
Yin yoga is a slow style of yoga in which poses are held for a long time, usually between two and five minutes, while the muscles stay as relaxed as possible. The idea is to place a gentle, sustained stress on the deeper tissues of the body, including ligaments, joints, and fascia, rather than working mainly on muscular strength or fitness. Because the poses are mostly seated or lying down, the practice feels calm and accessible, even for people who find vigorous yoga classes intimidating.
The practice is often described as a complement to more active, or yang, styles of yoga. Where a flowing class builds heat and strength, yin yoga encourages stillness, patience, and attention to sensation. Breathing stays natural and unforced, and the focus is on finding a shape that feels challenging enough to notice, but not so intense that you cannot relax into it. For a broader overview of pose names and variations, Yoga Journal’s pose library is a useful reference to explore alongside a teacher’s guidance.
How Yin Yoga Differs From Other Styles
The main difference is time. In a typical vinyasa class, a pose may last for only a few breaths. In yin yoga, the same amount of time is spent in just one or two poses. That longer hold changes the experience completely. At first, you may notice restlessness, boredom, or a strong urge to move. With practice, that discomfort often settles, and you begin to notice smaller changes in the body, such as a gradual release in the hips or a softening across the lower back.
Yin yoga also uses a different effort. Rather than engaging muscles strongly to hold a shape, you aim for about 70 percent of your maximum stretch. You should feel a clear sensation, but you should still be able to breathe comfortably and stay still. If you need to grip, clench your jaw, or hold your breath, you have gone too far. Ease out a little, add a prop, and let the pose do its work more gradually.
Key Yin Yoga Poses, Hold Times, and Benefits
The poses below are widely taught in yin classes and suit most beginners. Start with shorter holds and build up slowly. Always come out of a pose slowly, pause for a few breaths, and notice how your body feels before moving on.
1. Butterfly Pose
Sit with the soles of your feet together and your knees open to the sides. Sit tall for a few breaths, then fold forward gently, resting your hands on your feet or on blocks in front of you. Hold for three to five minutes. Butterfly pose stretches the inner thighs and groin, encourages the hips to release, and can feel grounding after a long day sitting at a desk.
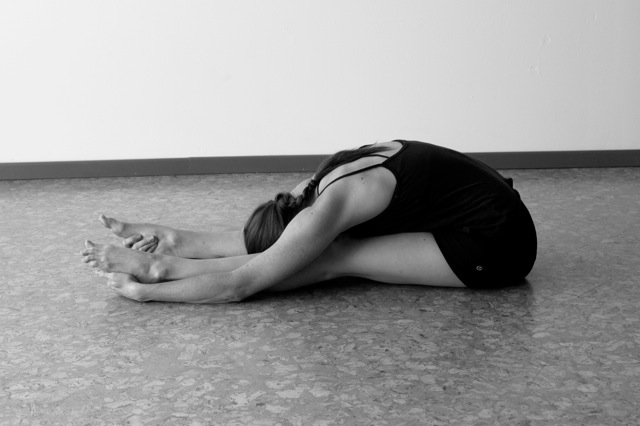
2. Caterpillar Pose
Sit with your legs straight in front of you and fold forward over your legs, keeping a slight bend in the knees if your hamstrings are tight. Let your head and arms hang, or rest your forehead on a bolster. Hold for three to five minutes. This forward fold stretches the back of the legs and the spine, and many people find it calming because the head is supported and the eyes can close.
3. Dragon Pose
From a low lunge, place your front foot flat on the floor and your back knee on the mat, with your hands on blocks or on your front thigh. Keep your hips facing forward and avoid forcing the front knee past the ankle. Hold for two to four minutes on each side. Dragon pose opens the hip flexors and the front of the thigh, which often feel tight after sitting or walking for long periods.
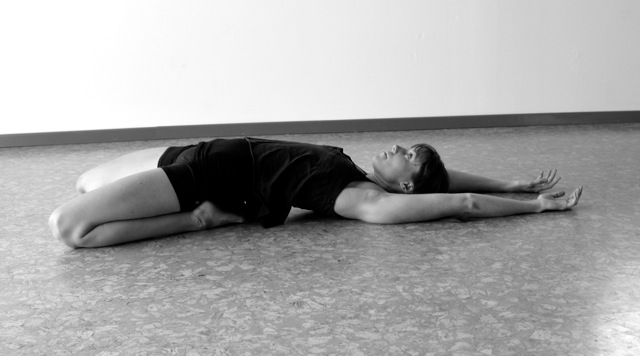
4. Saddle Pose
Kneel, then sit back between your heels or on a block, and slowly lean back onto your hands, forearms, or a bolster. This is a strong stretch for the front of the thighs and ankles, so beginners should stay upright at first and hold for only one to three minutes. Saddle pose can improve mobility in the knees and ankles, but it should never cause sharp pain, and people with knee problems should use plenty of support or skip it.
5. Swan Pose
From hands and knees, bring one knee forward behind your wrist and extend the other leg back, then fold forward over the front leg with your forehead resting on your hands or a block. Hold for three to five minutes on each side. Swan pose is a deep hip opener that stretches the outer hip and buttocks. Keep the front foot flexed and the back hip as level as you can, and come out slowly if the knee feels pinched.
6. Reclining Twist
Lie on your back, draw your knees to your chest, then drop them gently to one side while your arms open out to the sides. Support the knees with a bolster if they do not reach the floor. Hold for three to five minutes on each side. A reclining twist releases tension in the lower back, stretches the spine, and often helps the body wind down at the end of a practice.
7. Legs Up the Wall
Sit sideways against a wall, swing your legs up, and rest your back on the floor with a folded blanket under your hips if that feels better. Keep your arms relaxed by your sides. Hold for three to five minutes. This gentle inversion rests tired legs, eases the lower back, and is a good closing pose when you want
to finish feeling calm rather than energised.
A Simple Beginner Sequence
Try this 35-minute sequence two or three times a week. Move slowly between poses, and rest in a neutral shape for a minute after any strong hip or back stretch. There is no need to do every pose in the list above in one session, and it is better to practise regularly for a shorter time than to push through a long session once a month.
- Butterfly Pose, 4 minutes
- Caterpillar Pose, 4 minutes
- Dragon Pose, 3 minutes on each side
- Swan Pose, 4 minutes on each side
- Saddle Pose, 2 minutes, only if your knees feel comfortable
- Reclining Twist, 3 minutes on each side
- Legs Up the Wall, 4 minutes, followed by a few minutes lying quietly
Breathing in Yin Yoga
Breathing in yin yoga should be simple. Breathe in and out through the nose if that feels comfortable, and let the breath be slow and steady without forcing it to a set count. On each exhale, notice whether you can soften your shoulders, your jaw, or your hands. That small release is often more useful than trying to stretch further. If a pose starts to feel overwhelming, return your attention to the breath for a few cycles before deciding whether to stay, adjust, or come out.
Some people like to count breaths instead of watching the clock, but time is easier to manage in a longer hold. A timer with a gentle tone can help, because it stops you from checking the clock and lets you settle more fully into the pose. Avoid holding your breath during a stretch, as that usually increases tension rather than reducing it.
Common Mistakes to Avoid
- Going too deep too soon. A strong stretch does not mean a better practice, and forcing a pose can leave you sore the next day.
- Skipping props. Blocks, bolsters, and blankets are not signs of weakness. They help you stay in a pose long enough for it to be useful.
- Moving too quickly between poses. Come out slowly, pause, and let your body adjust before the next shape.
- Ignoring sharp or pinching pain. Dull, spreading sensation is normal in yin yoga, but sharp, stabbing, or joint pain is a signal to back off.
- Practising only when stressed. Yin yoga is most helpful as a regular habit, not only as a rescue when you already feel tense.
Who Should Be Careful?
Yin yoga is gentle, but it is not suitable for everyone in the same way. Be cautious if you are pregnant, have a joint condition such as hypermobility, have recently had surgery, or have an injury to the knees, hips, or spine. In those cases, use shorter holds, more support, and a more conservative range of movement, and talk to a qualified teacher or health professional before starting a new routine. If you feel numbness, tingling, or pain that does not ease when you adjust the pose, come out straight away.
Beginners with very tight hips or hamstrings often benefit most from starting with supported versions of the poses. Sitting on a folded blanket in Butterfly or Caterpillar pose, for example, can make the hips feel much more comfortable and allow the back to stay long. Progress in yin yoga is rarely dramatic from one session to the next. It shows up over weeks as a little more ease in everyday movement, such as sitting, walking, or getting up from the floor.
Frequently Asked Questions
How long should I hold yin yoga poses?
Most yin poses are held for two to five minutes. Beginners should start at the shorter end, around two to three minutes, and increase the time only when they can stay relaxed and breathe comfortably throughout the hold.
Can beginners do yin yoga?
Yes. Yin yoga is one of the most beginner-friendly styles because the poses are slow, supported, and mostly done close to the floor. Flexibility is not a requirement. Props, shorter holds, and a willingness to rest are all you need to begin.
How often should I practise yin yoga?
Two or three sessions a week is a good starting point for most people. Some people enjoy a short daily practice, while others prefer one longer session at the weekend. Regularity matters more than perfection, so choose a routine you can actually keep.
Is yin yoga good for flexibility?
It can help. Long, relaxed holds give the tissues around the hips, spine, and legs time to adapt, and many people notice improved range of movement over time. Flexibility gains are gradual, however, and they depend on consistent practice rather than forcing a deep stretch.
Do I need special equipment for yin yoga?
No. A mat, a blanket, and one or two firm cushions are enough to start. Yoga blocks and a bolster are helpful for supporting the knees, hips, and head, but household cushions and folded towels work well for most home practices.
Conclusion
Yin yoga poses are a practical way to slow down, stretch gently, and give your body time to recover from sitting, stress, and busy days. Start with a few poses, use props generously, and keep the sensation moderate enough that you can breathe and relax. Over time, that simple approach can make everyday movement feel easier and calmer. For another gentle, body-based way to unwind after a yin session, try following a progressive relaxation script and notice how the two practices complement each other.
This article is for general wellness information only and is not a substitute for professional medical advice. If you have a health condition or injury, seek advice from a qualified professional before starting a new exercise routine.
